Most sports turf managers have the know-how to replace a broken head, and in most cases can repair a ruptured pipe when needed. However, when it comes to electrical troubleshooting of a system, most will elect to call in an experienced irrigation contractor to diagnose and repair the issue. Obviously there will be a cost associated with this approach. Even if there is plenty of money allocated for irrigation maintenance, there is a good chance that a solid irrigation contractor has a backlog of work, and will not be able to get there right away. Therefore, the ability to diagnose and repair electrical issues within a system can be a valuable skill to have in your toolbox. In this article, we will explore basic troubleshooting in an attempt to shed light on the mysteries associated with this topic.
Typically, electrical troubleshooting is very logical. In order to best understand the process, it is very important to understand the electrical anatomy of a system. Of course, all systems are different, but if we can understand what is happening electrically with the system, we can adapt our methods to troubleshoot any system.
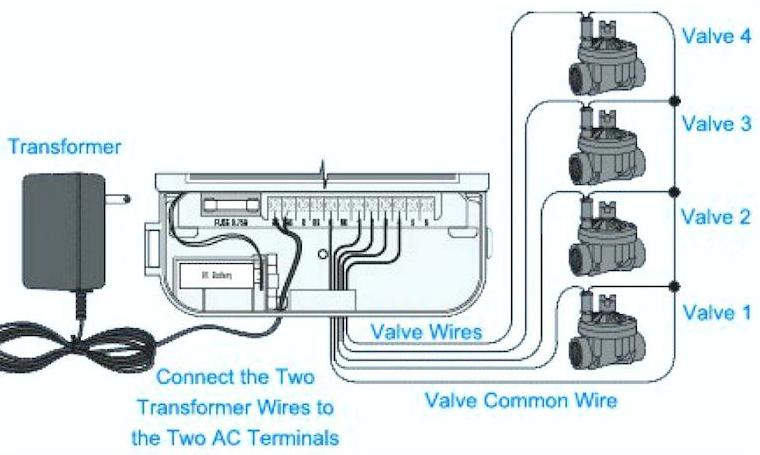
The basic electrical anatomy of a system involves three main components: the controller, the field wiring and the electric solenoid valves. Basically, when the controller sends a 24-volt signal through the field wiring to the valve, the 24 volts causes the valve to open, and water to pass through the valve to the heads. Since everything is initiated from the controller, we should begin our diagnostics at that point. The controller is plugged into a traditional 120-volt outlet. First, we need to make sure this is working. The controller’s transformer immediately converts the 120 volts to 24 volts before entering the electronics in the controller. When a zone turns on, 24 volts is sent to the solenoid on the valve through the field wiring.
When the 24 volts travels through the wiring around the solenoid, it creates an electromagnetic field that pulls up a metal plunger inside of the solenoid. This allows water past the solenoid and into the chamber below the valve’s diaphragm. Once the water pressure above and below the diaphragm equalizes, the diaphragm lifts and water passes through the valve and downstream to the heads.
Now that we better understand the basics of how electricity flows through a system, we can begin the process of troubleshooting. The most important diagnostics tool is a multimeter, which can test the voltage being sent from the controller, and the resistance (measured in ohms) throughout the field wiring. A decent multimeter can be purchased for less than $20 and is critical to the troubleshooting process.
At the controller we will begin by testing the resistance throughout the wiring in the field and the valves. This will give us a quick snapshot of the overall electrical “health” of the system. We do this by turning our multimeter to the “ohms” setting (Ω). With the controller not running, take one probe and touch the common wire terminal and the other probe to each of the numbered terminals. We should get readings of between 20 and 60 ohms depending on which type of valve we are testing. If we get a very high reading, there may be a nick in the wire, or a poor connection. If we get an infinity reading (∞), we have an open circuit, which may be a break in the wire.
These types of issues can be difficult to locate, as they may be buried underground. Checking connections is a good place to start. If the issue is underground, you may be able to employ the use of a wire tracer to locate the issue. If the resistance reading to the valve is very low, the wiring in the solenoid has probably gone bad. The solenoid will need to be replaced, which is a fairly easy repair. First, shut off the water to the valve. Then cut the two wires going into the bad solenoid. Unscrew the bad solenoid, and screw in the new one. Then reattach the two wires with waterproof wire nuts. [Note: It doesn’t matter which wire goes to the common wire, and which goes to the valve wire.]
The health of the solenoid can also be checked at the valve. Simply detach the two wires going into the solenoid, and test the resistance (ohms). You should get the same reading here as you did at the controller. If the readings are different, the issue is somewhere in the field wiring.
Next, use the controller to turn on the zone that is having the issue. Set the multimeter to read voltage and touch one probe to the common terminal, and the other to the zone terminal that is running. The controller should be sending out a signal of 24 volts (plus or minus 2). If the controller is sending out less than 22 volts, the issue is with the controller. It the controller is sending out zero volts, first check for a blown fuse. If the controller has a blown fuse, if will appear to be running, but no voltage will be going to the field. You can also check the voltage at the valve by touching one probe to each of the wires going into the valve. You should have the same reading here as you did at the controller. If the readings are different, the issue is somewhere in the field wires.
Electrical troubleshooting can be intimidating due to the fact that it is usually cloaked in mystery. However, the process is very logical. By understanding the basic electrical anatomy of a system, and utilizing the simple diagnostic techniques that we have explored, I am hoping this topic becomes less intimidating and more approachable.
Heath Traver, CIC, CLIA, is a specification manager for Rain Bird in the Northeast US, and is licensed to practice irrigation in New Jersey. He can be reached at htraver@rainbird.com.


