By Scott Stevens, CSFM
As you are driving around your complex checking on fields, you notice a wet area. There hasn’t been any rain; only your irrigation system has been watering the field. More than likely you have a leak in your irrigation system.
Ideally you did a routine check on your irrigation system before the summer was in full throttle heat mode and watering the fields was necessary. Now it’s July and most irrigation systems are being used extensively. Whenever you go through each zone to ensure safe, uniform coverage of each head, check for leaks or faulty irrigation heads. Some areas of the country the irrigation is turned off in the fall completely and drained of all water before the winter months. Over the winter months there are lots of unnoticed changes in the ground from the heaving and thawing of the cold winter temperatures. This heaving and thawing action moves irrigation pipes causing leaks. When the irrigation system is refilled with water in the spring, this is the best time to check for leaks.
In other parts of the country wintertime temperatures do not require irrigation systems to be shut down at all. If this is the case, you should still perform a test on your system. Whether you are on municipal water or water from a pond, even the smallest leak in your irrigation system can cost your facility hundreds of wasted dollars in your water budget, as well as not being sustainable for the environment.
Here are seven quick steps in checking your irrigation system and repairing a leak:
Step 1: Identify that you have an irrigation leak. A leak can be difficult to identify. During the spring when there is lots of rain, leaks can especially be difficult to detect. Be sure to perform the irrigation test on your system when there are several dry days. Once your irrigation system is refilled, if you see wet areas on your field, there has been no rain, and no irrigation water has been running, then you probably have some type of irrigation leak. A quick way to confirm is by looking at your pump/water meter to see if the pump/meter is running and no irrigation cycle is turned on. If your pump/water meter is running and there is no irrigation cycle turned on, then you certainly have a leak somewhere in your system. Decide, based on the complexity of the leak, if you will engage your irrigation technician, a commercial technician, or repair the leak yourself.
Step 2: Isolate the source of water. After you have identified where the leak is located, try to isolate the source of water to the leak by shutting off the flow to where the leak is found. The leak is either in the main water line, a lateral line, a faulty irrigation head, or at the irrigation valve. Most leaks occur where pipes are joined together, at points of connection, or around irrigation valves. Occasionally a leak will occur in the middle of a pipe where the pipe has split or broken. This is often the case when a rock or other debris is rubbing against the pipe. Irrigation systems have isolation valves that can turn off different sections of the mainline, so the whole system does not have to be turned off. If the leak is on a lateral line, meaning within a certain irrigation zone that is past the irrigation/zone valve, turn the irrigation zone off on your irrigation controller until the leak can be fixed or shut down the irrigation valve. Irrigation/zone valves can act like isolation valves. If there are no isolation valves within your system, then just turn the pump or water meter off to stop all water flow.
Step 3: Determine how to repair the leak. Check the site plans for the irrigation layouts to determine what size pipe is in the area. This will help determine what kind of fix is needed to repair the leak. If no site plans can be found you will have to wait until the leak is uncovered to figure out what parts are needed to make the repair. Check the scheduled use of the field, then communicate to users that the field will be not be able to be used while the leak is being repaired.
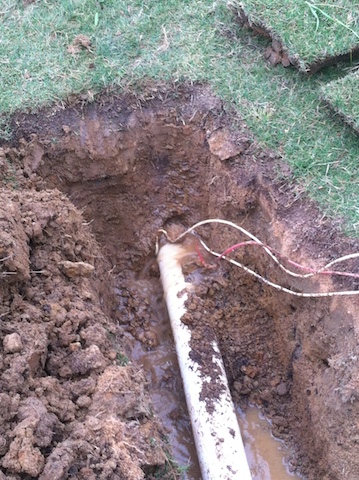
Step 4: Dig up the area where the leak is located. Begin to dig up the area where you think the leak is located. Before excavating, cut the sod or remove the grass in sections. Try to keep your excavation hole small, so you are not disturbing unnecessary ground. This will help when you repair the area to restore its original look. Be sure your hole is big enough, however, to locate the leak and allow enough space to properly access and fix it. The goal is to avoid putting fixes in place that could jeopardize the pipes or cause the repair not to hold. If you still are having trouble finding the leak once the area is dug up, turn the water flow back on slightly. Just turn the point of shut off on until you hear water flowing. Do not turn on full water flow as this could cause a bigger blow out in the area of the leak, especially with the dirt being removed. Usually, by slightly turning on the water flow, there will be enough water to go through the pipes to show where the leak is located. Hairline splits in pipe are difficult to detect and can be seen more easily with a minor flow of water running. Given that you have already dug around the expected location, your repair hole will more than likely require pumping or you will need to wait for the water to disappear. If the leak takes more than a day to fix, make sure to cone off/place caution tape around the area to prevent any accidental falls into your repair hole.
Step 5: Get the parts to repair the leak. Now that you have located the leak, see what type of fix is required. For valves that are leaking you may just need a rubber flange or to re-tape the threads on the pipes that connect to the valve using plumber’s tape. If you found the leak is on a pipe you can use slip fixes, couplers, compression sleeves, mechanical coupling joints, or new piping to repair the break. The size/type of pipe and the expected water pressure through the pipe will determine which kind of repair is required. Most lateral lines can be fixed with slip fixes, couplers, or compression sleeves. Mainline irrigation pipe tends to be larger in size conducting higher levels of water pressure. A repair on this bigger pipe typically requires either a compression sleeve or a mechanical coupling joint as these two devices can handle more water pressure.
Step 6: Repair the leak. Measure twice and cut once. This carpenter’s rule also applies to repairing irrigation leaks. This will ensure that you remove exactly the right amount of pipe to repair the leak and then fix the leak. Once the break area has been removed, install the new parts to restore the irrigation system. If you use a slip fix, coupler, or new pipe you will need to use PVC cleaner and glue to reattach your parts. Using the cleaner first, even on new pipe, will allow the PVC glue to better adhere between connections. Use enough cleaner to remove the printed writing on the pipe. Once this cleaner has dried apply the glue. Allow time for your glue to setup before turning back on the water. If the break is at a 90-degree joint, a “T” fitting, or any other area where the pipe comes to a stop to change angles, install a thrust block behind the joint. A thrust block can be as simple as a bag of cement mix installed between the backside of the joint and the ground around it to keep the pipes from pushing outward. Once the thrust block is installed and the glue has set, which could take several hours depending on air temperatures, turn back on the irrigation. The warmer the air temperature the quicker the glue will set. Again, turn the water on slightly so that there is not full water flow. Also, to help relieve water pressure, you can turn an irrigation zone or two on beyond the repair before turning back on the water. The irrigation zone should be located past the leak. This will allow air to be pushed out of the pipe through the irrigation zone rather than back through the water flow. Leaving the air in the pipe without giving a place for the air to escape the irrigation system could result in another irrigation leak or the current leak to break again.
Step 7: Clean up the work area. Make sure to clean up the repair area and get it looking as if the leak never happened. All the dirt that came out of the hole should be able to fit back into the hole. Shovel in the dirt around the repaired area and pack it lightly until the hole is filled. Install the sod cut pieces or grass sections back to the way they were before you began digging. Tamp the entire area and level. Mark on your irrigation site plans where you made the repair. If you do not have an irrigation site plan of the field you should make one for future reference.
Take time in your schedule to do regular checks and maintenance on your irrigation system. Companies offer irrigation audit services that check the efficiency and effectiveness of your irrigation system. Irrigation systems, as well as environment changes over time, change how your system works. Whether your irrigation system is old or new this is a sure way to find out if it is working properly. As turf managers, fixing leaks and making systems work efficiently is a responsibility of the job. Even the smallest of leaks can cost lots of money and cause headaches, but they need to be fixed correctly and proficiently in order to be environmentally sustainable and to make fields safe for play. Always be sure to use the correct parts and make the area look like it was before you began repairing the leak. This will allow play to continue on your field safely, sometimes without users even noticing!
Scott Stevens, CSFM, MBA, is sports turf manager at Elon University, Elon, NC, and a member of the Sports Turf Managers Association’s Editorial Committee.